For when you really want to impress without spending too much time baking a dessert, there’s this vegan chocolate vanilla ice cream pie with peanut butter hot fudge sauce! With a press-in date-walnut crust, two flavours of ice cream, and seductive peanut butter hot fudge sauce, this is my favourite dessert for sports night, date night, or any old night!
If you have been following along all week, you know that it’s Super Bowl week here at Up Beet Kitchen. While I’m not the biggest NFL fan in the world, the rest of my family certainly is, and I’ve been humouring them by cheering for the Green Bay Packers this year. Even though they didn’t make it to the Super Bowl, I figured I would still make the most of it by developing some game day recipes for everyone to enjoy.
So far, I’ve shared Moroccan Chickpea Burgers, White Bean Spinach Artichoke Dip, and Buffalo Tempeh Fajitas. No menu is complete without dessert, so allow me to introduce to you what is sure to become a new favourite in your house: Vegan Chocolate Vanilla Ice Cream Pie with Peanut Butter Fudge Sauce!
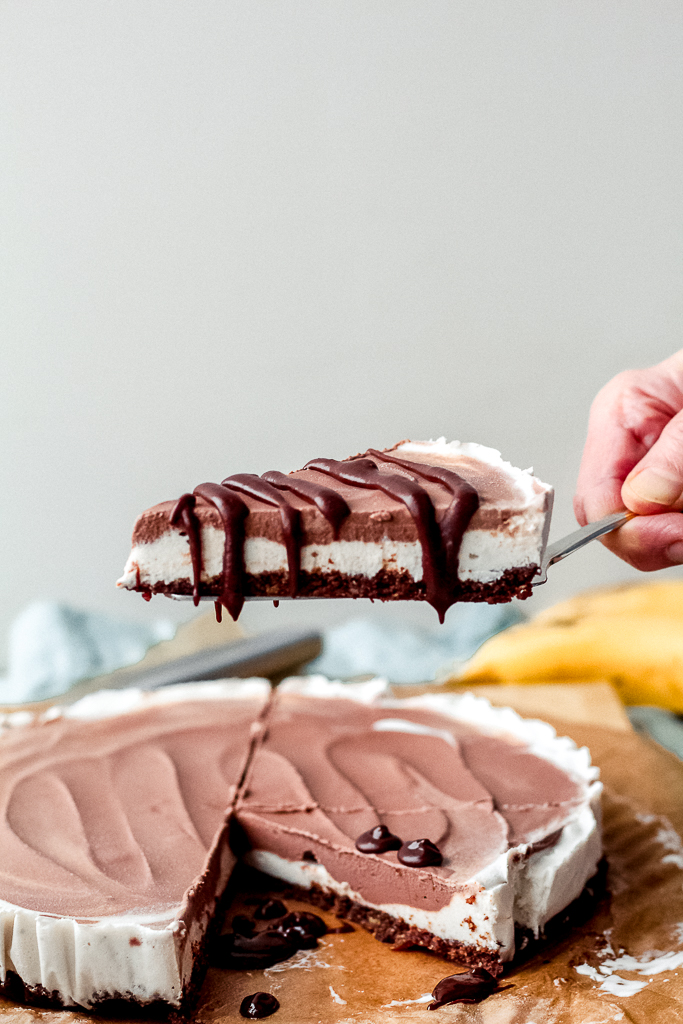
Ooooh la la. I made this for the first time on New Year’s Eve, and I haven’t stopped thinking about it since. A date-walnut-cocoa crust is pressed into a round cake pan lined with parchment. Then, a layer of vegan vanilla ice cream is added, followed by a layer of vegan chocolate ice cream. That goes into the freezer for awhile (preferably a few hours) to firm up, and right before serving, it’s drizzled with a thick and luxurious vegan peanut butter fudge sauce.
It’s simple to prepare, but it’s sure to dazzle everyone to whom you serve it!

vegan ice cream pie ingredients
- For the crust: Dates, walnuts, cocoa, sea salt, and vanilla extract.
- For the ice cream layers: A pint of vegan vanilla ice cream and a pint of vegan chocolate ice cream.
- For the peanut butter hot fudge: Chocolate chips, coconut milk, peanut butter, and a pinch of sea salt.
how to make vegan ice cream pie
- Make the crust: Combine the walnuts, dates, cocoa, salt, and vanilla in a food processor and process until a mixture that sticks together when pressed between your hands forms.
- Line a 9-inch round cake pan (or pie plate, in a pinch) with parchment paper, with overhang to allow you to lift out the pie later on.
- Crumble the crust mixture evenly over the bottom of the prepared pan. Use your fingers to firmly press it evenly over the bottom and just slightly up the sides of the pan.
- Prepare the ice cream layers: There are two ways to do this. If you own a stand mixer with a paddle attachment, perfect. If not, I came up with a solution that works almost as well.
- If you are using a stand mixer with the paddle attachment, place the softened vanilla ice cream in the bowl of the mixer and use the stand mixer to whip it until a soft serve consistency is achieved. Be careful not to over-whip, or you will end up with a messy, melted situation. Using a spatula, scoop the ice cream over the prepared crust and spread it out in an even layer. Repeat this step with the softened chocolate ice cream.
- If you are using a food processor, place the softened vanilla ice cream in the (cleaned out) bowl of the food processor fitted with the ‘S’ blade. Process just until a soft serve consistency is achieved, pausing to scrape down the sides of the bowl as needed. Use a spatula to transfer it onto the prepared crust, and spread it in an even layer. Repeat this step with the softened chocolate ice cream.
- Cover the ice cream pie to prevent ice crystals from forming on top. (I like to use my Abeego reusable food wrap for this purpose.) Transfer the ice cream pie into the freezer and chill until firm, 4 hours.
- A few minutes before serving, prepare the peanut butter hot fudge: Combine the chocolate chips and chilled coconut milk in a small saucepan over low heat. Whisk often, until it’s melted and has the consistency of a thick chocolate sauce. Whisk in the peanut butter and a pinch of salt. Remove from the heat.
- To serve, lift the pie out of the pan and slice into 8-12 pieces. (Nutritional information reflects 12 servings of pie, which is a more reasonable amount- my family and I enjoyed larger slices because we are a bit gluttonous.) Plate and drizzle with the hot fudge sauce. Garnish with sliced banana and/or berries, if desired.


more tasty vegan dessert recipes
- Vegan Pumpkin Spice Cupcakes (Maple Sweetened)
- Vegan Mini Mango Cheesecakes (No-Bake)
- No-Bake Vegan Nanaimo Bars


I hope that you love this vegan chocolate vanilla ice cream pie! If you make it, let me know how you enjoyed it by leaving a comment and rating below the post. And if you share a photo to Instagram, tag it @upbeet.kitchen and #upbeetkitchen.
Enjoy!
Print
Vegan Chocolate Vanilla Ice Cream Pie with Peanut Butter Fudge Sauce
- Total Time: 4 hours 10 minutes
- Yield: 8-12 servings 1x
- Diet: Vegan
Description
For when you really want to impress without spending too much time baking a dessert, there’s this vegan chocolate vanilla ice cream pie with peanut butter hot fudge sauce! With a press-in date-walnut crust, two flavours of ice cream, and seductive peanut butter hot fudge sauce, this is my favourite dessert for sports night, date night, or any old night!
Ingredients
Crust
- 1 ½ cups raw walnut halves
- 1 cup pitted Medjool dates (must be very soft for best results)
- 2 tablespoons cocoa powder
- ¼ teaspoon fine sea salt
- ½ teaspoon vanilla extract
Ice Cream Layer
- 1 pint (500 mL) vegan vanilla ice cream (I love Coconut Bliss)
- 1 pint (500 mL) vegan chocolate ice cream (I love Coconut Bliss)
Peanut Butter Hot Fudge (Makes extra)
- ⅔ cup semisweet chocolate chips
- ⅓ cup chilled coconut cream (the cream that separates in a can of coconut milk when refrigerated- see note)
- 1 tablespoon smooth peanut butter
- Pinch of fine sea salt
Instructions
- Make the crust: Combine the walnuts, dates, cocoa, salt, and vanilla in a food processor and process until a mixture that sticks together when pressed between your hands forms.
- Line a 9-inch round cake pan (or pie plate, in a pinch) with parchment paper, with overhang to allow you to lift out the pie later on.
- Crumble the crust mixture evenly over the bottom of the prepared pan. Use your fingers to firmly press it evenly over the bottom and just slightly up the sides of the pan.
- Prepare the ice cream layers: There are two ways to do this. If you own a stand mixer with a paddle attachment, perfect. If not, I came up with a solution that works almost as well.
- If you are using a stand mixer with the paddle attachment, place the softened vanilla ice cream in the bowl of the mixer and use the stand mixer to whip it until a soft serve consistency is achieved. Be careful not to over-whip, or you will end up with a messy, melted situation. Using a spatula, scoop the ice cream over the prepared crust and spread it out in an even layer. Repeat this step with the softened chocolate ice cream.
- If you are using a food processor, place the softened vanilla ice cream in the (cleaned out) bowl of the food processor fitted with the ‘S’ blade. Process just until a soft serve consistency is achieved, pausing to scrape down the sides of the bowl as needed. Use a spatula to transfer it onto the prepared crust, and spread it in an even layer. Repeat this step with the softened chocolate ice cream.
- Cover the ice cream pie to prevent ice crystals from forming on top. (I like to use my Abeego reusable food wrap for this purpose.) Transfer the ice cream pie into the freezer and chill until firm, 4 hours.
- A few minutes before serving, prepare the peanut butter hot fudge: Combine the chocolate chips and chilled coconut milk in a small saucepan over low heat. Whisk often, until it’s melted and has the consistency of a thick chocolate sauce. Whisk in the peanut butter and a pinch of salt. Remove from the heat. Note: It is very important not to add the peanut butter until the very end. If you add it at the same time as the coconut milk and chocolate, the whole mixture will seize up.
- Remove the pie from the freezer and let it soften for a couple of minutes.
- To serve, lift the pie out of the pan and slice into 8-12 pieces. (Nutritional information reflects 12 servings of pie, which is a more reasonable amount- my family and I enjoyed larger slices because we are a bit gluttonous.) Plate and drizzle with the hot fudge sauce. Garnish with sliced banana and/or berries, if desired.
Notes
You’ll need to chill a can of coconut milk the night before you make the peanut butter hot fudge, since you’ll be scooping off ⅓ cup of the hardened cream that separates from the water in the can when chilled. Refrigerate the remaining coconut cream for a week. You can use it to make coconut whipped cream or another batch or two of this sauce, or enjoy it in smoothies.
You won’t need all of the peanut butter hot fudge sauce for the ice cream pie- store it in an airtight jar at room temperature for at least a week. It comes in handy when a chocolate craving hits!
- Prep Time: 4 hours 10 minutes
- Category: Dessert
- Method: Freeze
- Cuisine: American
Nutrition
- Serving Size: 1 slice (does not include sauce)
- Calories: 342
- Sugar: 31.1 g
- Sodium: 92.7 mg
- Fat: 21.2 g
- Saturated Fat: 8.3 g
- Carbohydrates: 36.4 g
- Fiber: 2.9 g
- Protein: 5.3 g
PIN THIS FOR LATER:

jacquie says
i noticed the calorie count and serving sizes are different. Is that is a mistake? why isn’t the calorie count for the serving size? if the actual serving size is 8 then what is the calorie count? thanks.
Allison says
Hi Jacquie, thanks for noticing that. At the top of the recipe card, I have written that it serves 8-12. In the instructions, I realized that I only said to slice into 8 pieces. I’ve corrected that to 8-12 slices. Twelve slices will give smaller servings (which reflect the calorie count), while eight slices will give larger servings that will be about 450 calories per slice. Hope this helps. Thanks again for noticing! 🙂